Wednesday, December 31, 2014

Adding Strain Relief to Your Logitech UE900 Cables

I purchased a UE900 Vi cable for my Shure 215s awhile ago. I really like how light the cable is compared to the stock Shure cable. The UE cable also significantly cuts down on cable microphonics. The only thing the UE cable lacked was proper strain relief at the TRS plug.


As you can see from the picture, the UE cable terminates into the TRS plug without proper strain relief. This design flaw allows the cable to bend sharply, especially when inside a pocket. This sharp bending will greatly reduce the lifespan of the cable. Fixing this design flaw is easy and works for any cable.

What you'll need:
  • spring
  • wire snips
  • shrink wrap
I pulled a spring out of a retractable ball point pen.


I then bent one end of the spring open so I could wrap it around the cable.


I made sure that the spring was wrapped around the plastic "collar" of the TRS plug.


I then snipped the excess spring from around the plug.


I threaded shrink wrap onto the cable starting from the top of the cable.


Placed the shrink wrap onto the TRS plug making sure there the spring was still attached to the collar of the the plug.


I applied heat to the shrink wrap and fixed a bit of the spring that was uneven at the top.


Now I don't have to worry about my cable being damaged when my player is sitting inside my pocket.

Sunday, December 28, 2014

Stop Xubuntu From Turning of Your Monitor Every 10 minutes

There is this nasty little bug in Xubuntu 14.04 and 14.10 that turns on a blank screensaver every ten minutes regardless of your power or light locker settings.

You can check your xset settings to see if your system is suffering from the same problem.

In a terminal type:

xset -q
Keyboard Control:
  auto repeat:  on    key click percent:  0    LED mask:  00000002
  XKB indicators:
    00: Caps Lock:   off    01: Num Lock:    on     02: Scroll Lock: off
    03: Compose:     off    04: Kana:        off    05: Sleep:       off
    06: Suspend:     off    07: Mute:        off    08: Misc:        off
    09: Mail:        off    10: Charging:    off    11: Shift Lock:  off
    12: Group 2:     off    13: Mouse Keys:  off
  auto repeat delay:  500    repeat rate:  20
  auto repeating keys:  00ffffffdffffbbf
                        fadfffefffedffff
                        9fffffffffffffff
                        fff7ffffffffffff
  bell percent:  50    bell pitch:  400    bell duration:  100
Pointer Control:
  acceleration:  13/10    threshold:  4
Screen Saver:
  prefer blanking:  yes    allow exposures:  yes
  timeout:  600    cycle:  600
Colors:
  default colormap:  0x20    BlackPixel:  0x0    WhitePixel:  0xffffff
Font Path:
  /usr/share/fonts/X11/misc,/usr/share/fonts/X11/Type1,built-ins
DPMS (Energy Star):
  Standby: 0    Suspend: 0    Off: 3600
  DPMS is Disabled
xset has been forcing a blank screensaver to activate every 600 secs (10 minutes).

Fixing it requires a simple terminal command:
xset s off

Install and Customize notify-osd in Xubuntu

I love Ubuntu's notification system, it manages to be both functional and beautiful, but it lacks customization options.

The following guide will show you how to install a custom version of Ubuntu's notify-osd that will allow you full control of the color, text, opacity, behavior and location of your notifications.

You first need to install two PPAs. leolik's PPA contains a customizable notify-osd package. amandeepgrewal's PPA includes notifyosdconfig, a gui interface that makes customizing notify-osd much easier.


To add leolik's PPA:
sudo add-apt-repository ppa:leolik/leolik

To add amandeepgrewal's PPA:
sudo add-apt-repository ppa:amandeepgrewal/notifyosdconfig

Install the necessary packages:
sudo apt-get update && sudo apt-get install notify-osd notifyosdconfig


For Xubuntu Users:

You can uninstall Xfcebuilt in notifaction system xfce4-notifyd:
sudo apt-get remove xfce4-notifyd


Or you can just set notify-osd as the default notification service. Sometimes after an Xubuntu update xfce-notifyd replaces notify-osd as your default notification service and you'll have to repeat this step.

Open a terminal:
gksu gedit /usr/share/dbus-1/services/org.xfce.xfce4-notifyd.Notifications.service

Replace:
Exec=/usr/lib/xfce4/notifyd/xfce4-notifyd

With:
Exec=/usr/lib/notify-osd/notify-osd

Save and exit.

You will have to reboot your computer for the changes to take effect.

Sources: 1 2 3

Sunday, December 21, 2014

Install Microsoft Fonts In Ubuntu

Install the Microsoft Core Fonts
sudo apt-get install msttcorefonts

Make a font directory
sudo mkdir /usr/share/fonts/Vista

Make a tempory storage directory
mkdir ~/Desktop/Vista

Download Microsoft Power Point Viewer 2007

Open the .exe file with Archive Manger

Double click ppviewer.cab file

Select each .TTF (TrueType font) file by single clicking it while holding down CTRL. Then select Extract. Save these fonts in the Desktop folder you created.

Move the extracted Microsoft fonts to your system font folder
sudo mv ~/Desktop/Vista /usr/share/fonts/Vista

Update your font cache
sudo fc-cache -fv

Your Windows fonts are ready to be used by any program or user on your system, you can delete the temporary Desktop folder.

Installing a TTF Font

Step 1: Prepare your files
Uncompress your fonts (right click>Extract Here). 


Step 2: Now make a directory for your custom ttf fonts
in a terminal type:
sudo mkdir /usr/share/fonts/truetype/custom


Step 3: Put the ttf font into the folder your created
In a terminal type:
gksu nautilus (for ubuntu)
gksu thunar (for xubuntu)

This will bring up a nautilus/thunar window, navigate to /usr/share/fonts/truetype/custom and copy/paste your fonts into this folder.


Step 4: Rebuild your font cache
In a terminal type:
sudo fc-cache -f -v

Wednesday, December 17, 2014

Fixing the ttf-mscorefonts-installer error in Ubuntu 14.10

When using the ubuntu-restricted-extras or xubuntu-restricted-extras meta package to install mscorefonts in Ubuntu 14.10 the package fails to install correctly. This bug has been around since the alpha builds. Installing the package separately fixes the errors with downloading the extra data files.


To fix it, in a terminal enter: 
sudo dpkg -P ttf-mscorefonts-installer
sudo apt-get install ttf-mscorefonts-installer

Monday, December 15, 2014

How To Make A Mr Speakers Mad Dog Pro Cable

I love my Mr Speakers Mad Dog Pro headphones but the included 6ft cable is too short. Below are my notes on making a longer or shorter unbalanced stereo Mad Dog Pro audio cable.

What you need
You can use a 1/4 or 1/8th TRS adapter depending you your needs. I used a Rean Neutrik NYS228G 1/4th connector.


The pin layout:


1 = L+
2 = L-
3 = R+
4 = R-


There is a notch at the top of the SN-8-4(P) connector that you can use as a reference. Each pin is numbered but it is incredibly difficult to see the number when soldering.

1 = L+ used for left audio channel
3 = R+used for right audio channel

2 = L- ground
4 = R- ground


You should strip the Canare cable about 3/4th of an inch. Twist each strand tight, going with the natural bias of the wire, and then tin each strand. Measure each strand against the e-valucon plug and trim the strands down appropriately before soldering. It doesn't take alot of solder to make a solid connection to the e-valucon SN-8-4 plug. Patience and a steady hand is key.


Soldering the TRS adapter is much easier. Twist the L- & R- cable together and tin them with solder to form a common ground. Then solder the common ground, left and right audio channels to the appropriate connections.


Friday, September 19, 2014

Pretty Root Windows

Make you root windows pretty in Ubuntu/Debian/Mint

In a terminal type:
sudo ln -s ~/.themes /root/.themes
sudo ln -s ~/.icons /root/.icons

Sunday, June 15, 2014

Netflix & Amazon Prime Video in Ubuntu 14.04

Pipelight uses a patched version of WINE to install the Microsoft Silverlight plugin used by Netflix and Amazon Prime Video. Pipelight automatically installs, configures and updates all the necessary components and dependencies for video playback. Once installed Silverlight will behave just like any other normal browser plugin. In order to watch Netflix and and Amazon Prime Video after installing Pipelight, you will need to set Firefox to spoof a compatible User-Agent String. Once configured playback works seamlessly.

Add the Pipelight's Ubuntu Personal Package Archives (PPA)
sudo apt-add-repository ppa:pipelight/stable
Update your system
sudo apt-get update
Install Pipelight and the necessary dependencies
sudo apt-get install --install-recommends pipelight-multi
Update the Pipelight plugin
sudo pipelight-plugin --update
Enable Pipelight for every user on your system
sudo pipelight-plugin --enable silverlight
Install the Firefox add-on UAControl. There are other add-ons that work but UAControl  works automatically. If you can not get UAControl working for you, you can try another method.

To access UAcontrols preferences either navigate to Tools>Add-ons or use the key combination Cltrl+Shift+A

Click Add Site and enter the website you want to send a specific user-agent string
www.netflix.com
www.amazon.com
And use one of the following user-agent strings:
Mozilla/5.0 (Windows NT 6.1; WOW64; rv:15.0) Gecko/20120427 Firefox/15.0a
Mozilla/5.0 (Windows NT 6.1; WOW64; rv:22.0) Gecko/20100101 Firefox/22.0
Mozilla/5.0 (Windows NT 6.1; rv:23.0) Gecko/20131011 Firefox/23.0


On my Dell XPS 13 the first string works for playback, on my desktop the second string works. Don't be discouraged. Try each string after restarting your browser until you find one that works.

Source

Thursday, June 5, 2014

Installing Ubuntu/Xubuntu 14.04 on the Dell XPS model 9333

Installing Ubuntu 14.04 on my Dell XPS 13 model 9333 requires a little more work than anticipated. This guide will show you how to get the touchpad working correctly and fix headphone jack audio bug.  This guide works for Ubuntu and any of it's derivatives using 14.04 as its code base.

I use Xubuntu on my XPS 13. I love Ubuntu, but Xubuntu offers me more control and a workspace that matches my workflow. No matter what edition of Ubuntu you decide to use, Trusty Tahr works really well on the Dell XPS 13.


Terminal commands are highlighted in blue. Ubuntu users need to use gedit instead of mousepad in their terminal commands.

Update your system
sudo apt-get update

Upgrade
sudo apt-get update

Reboot if necessary
sudo reboot

The updated Synaptic drivers for the XP3 13 touchpad are currently in Test Kernels. Canonical is doing their best to try and backport this functionality into 14.04 LTS so that users can take advantage of native i2c touchpad support. Until then you can download a test kernel or enable the testing repository. I downloaded acelan's testing kernel. Make sure you download all 4 debs. Install and reboot.
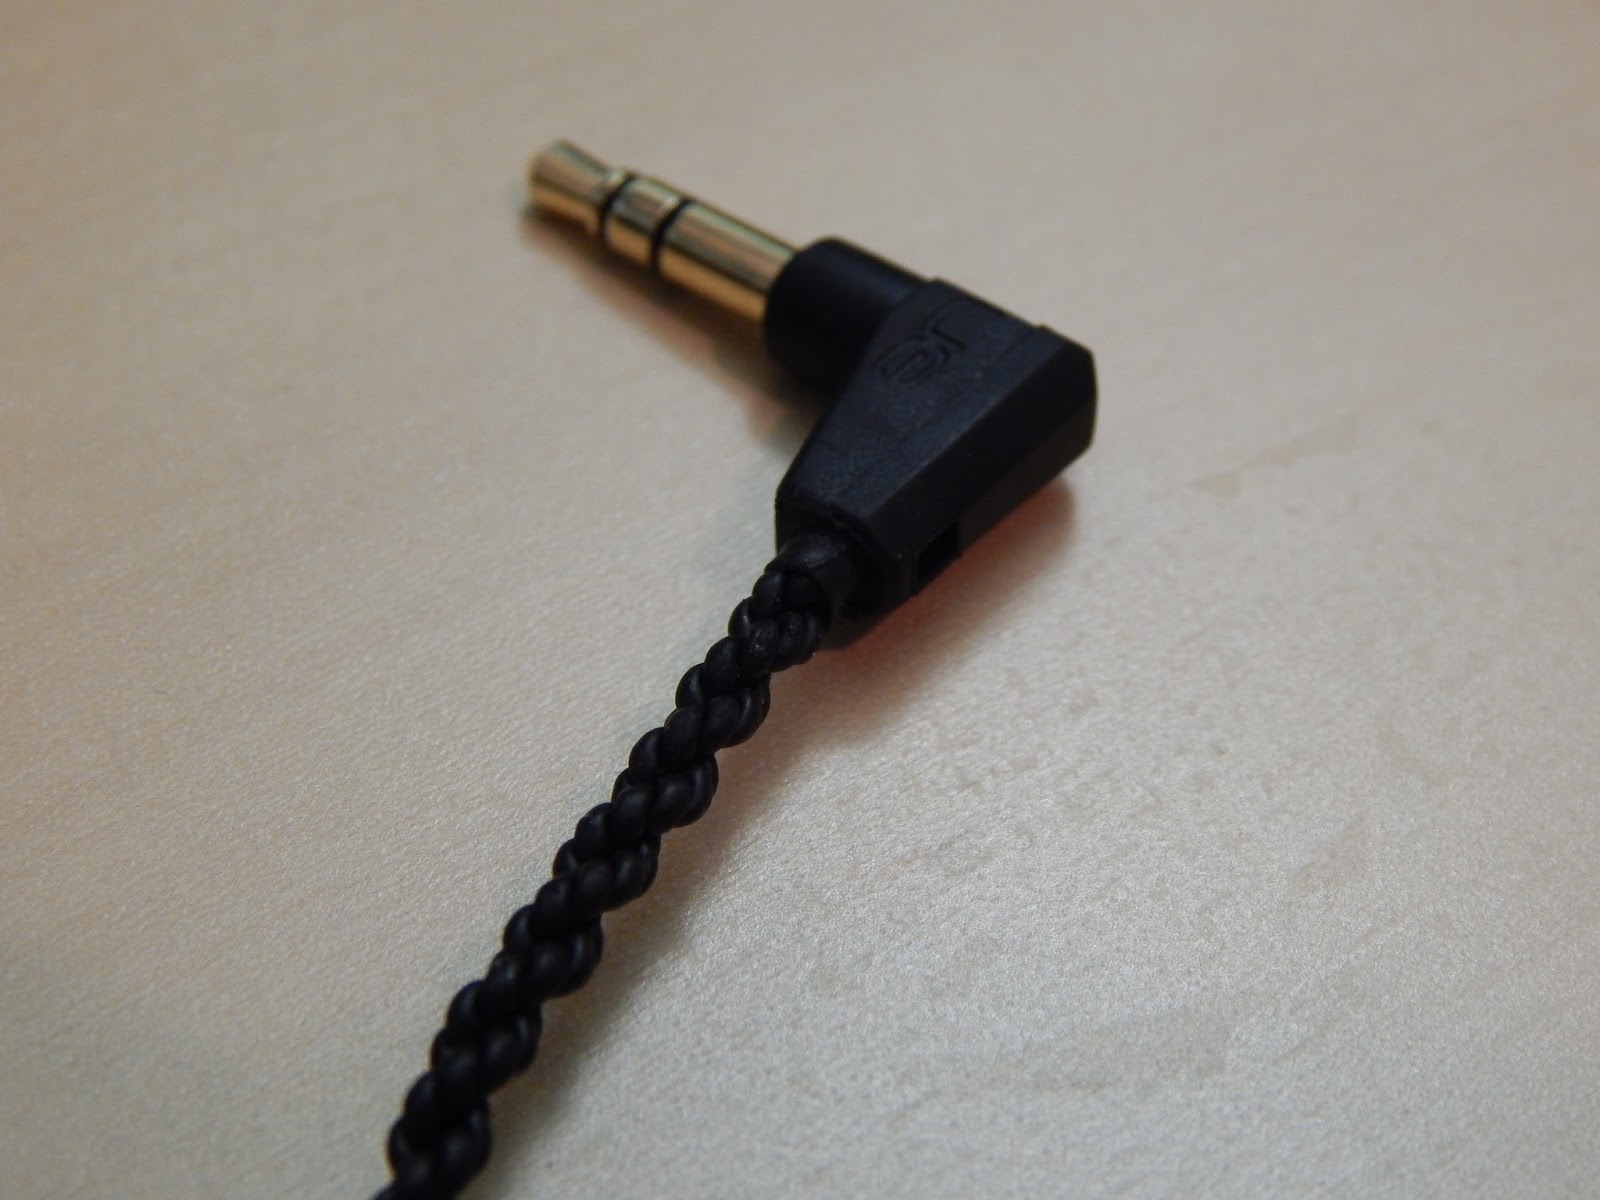


There is constant white noise that can be heard when headphones are plugged in, it makes using the audio jack impossible. There is also a poping noise heard when plugging in headphones. The fix involves creating a script and disabling the power saving mode of the audio card.The good news is this bug has been fixed in 3.16 kernels.

It is easier to run the commands as root, open a root terminal:
sudo su
Setup an init script to load the headphone fix at boot:
mkdir -p /etc/init.d/
wget -q -O /etc/init.d/xps http://xps13-9333.appspot.com/root/etc/init.d/xps
chmod +x /etc/init.d/xps
update-rc.d xps defaults

Create the audio fix script:
mkdir -p /usr/local/bin
wget -O /usr/local/bin/white_noise_fix.py http://xps13-9333.appspot.com/root/usr/local/bin/white_noise_fix.py
chmod 744 /usr/local/bin/white_noise_fix.py

Disable the power saving mode"
mkdir -p /etc/pm/config.d
echo INTEL_AUDIO_POWERSAVE=false > /etc/pm/config.d/snd_hda_intel

Apply the changes without needing a reboot:
echo 0 > /sys/module/snd_hda_intel/parameters/power_save
white_noise_fix.py

exit root permissions:
exit


For Xubuntu users:

You'll notice that there is significant screen tearing when watching videos in Xubuntu. Xfce's default window manager xfwm4 does not have sync to VBlank support. Compton supports VBlank and I written a guide for setting it up properly for the Dell XPS 13.

Before you install and configure Compton you need to turn off xfwm4 compositor. Under Settings>Window Manager Tweaks>Compositor


 Install and configure Compton:
sudo apt-get install compton
wget  -O ~/.config/compton.conf https://dl.dropboxusercontent.com/u/6062904/compton.conf

Then set Compton to run at startup. Under Settings>Session and Startup>Application Autostart. Click the Add button:


Name: Compton
Description: lightweight standalone compositor
Command: compton -b

Enable the Intel driver TearFree option:
sudo mkdir -p /etc/X11/xorg.conf.d/
sudo wget -q -O /etc/X11/xorg.conf.d/10-intel.conf http://xps13-9333.appspot.com/root/etc/X11/xorg.conf.d/10-intel.conf

reboot
sudo reboot

Check to see it was enabled
cat /var/log/Xorg.0.log | grep Tear


There are a couple options for configuring multitouch gestures in Ubuntu 14.04. I'm trying to get Touchegg working. Until then I'm using a simple bash script to tweak my synclient settings.

To setup the script:
mkdir ~/.scripts
touch ~/.scripts/touchpad_config.sh
chmod 744 ~/.scripts/touchpad_config.sh
mousepad  ~/.scripts/touchpad_config.sh


These settings change the tapping behavior, you can place whatever tweaks you want inside of it. Having the script wait 10 second or so provides enough time for the system to load, you can remove it but I prefer a bit of a buffer.
 #!/bin/bash
    sleep 10s &&
    synclient TapButton1=1;
    synclient TapButton2=2;
    synclient TapButton3=3

Feel free to leave comments and suggestions in the comments.

Wednesday, June 4, 2014

Improving the Comfort of the Audio-Technica ATH-M50 Ear Pads

My Audio-Technica ATH-M50 are now my main headphones on my desktop. They are great set of headphones and real price performance winners. Shortly after buying them I stopped listening to them. I usually wear on-ear headphones when out and about. My JVC HA-S500-B don't bother me after hours of use. The ATH-M50 pads clipped the outside edges of my ears and the foam filter rubbed up against the middle of my ear. I couldn't stand wearing them for over 30-45 minutes. My ear would get hot and raw.

Because how uncomfortable they were my ATH-M50s rotted in a case for the last year until I bought a Schiit Stack. I tried them on a whim and realized I really dig their sound.  I hopped online and started looking for a fix.

* Note my ATH-M50s have am aftermarket removable cable mod

The first thing I decided to do was extend the depth of the ear pads using cotton. By placing a 1cm thick layer of stretched cotton balls under the pads I fixed a majority of the pain I experienced. The stock ATH-M50 pads are just too shallow for a guy with large ears. The more I used them, the more I fell in love with them. For about $1.50 in cotton balls I was able to use my ATH-M50s for extended periods of time.

Cotton modded (left) pad vs stock pad (right), notice the change in depth


Making the stock pads thicker and moving the driver off your ear greatly improves the comfort of the ATH-M50s. I recommend this mod to every owner. It's 100% reversible and cheap. You will be amazed at how much better your ears feel during extended listening sessions. I didn't notice a change in the sound signature either. Try it out and let me know what you think.


I decided to take the next step and look into replacement pads. There is a huge thread on head-fi.org about replacing the ATH-M50s pads.  I read all 26 pages of the thread and many of the linked articles. There was no clear winner on which pads were the best. I ended up going with the Shure HPAEC840 Replacement Ear Cushions For SRH840 Headphones. They are larger and deeper than the ATH-M50s ear pads.

Shure 840 pad (left) vs stock pad (right), notice the difference in depth and overall size. Much bigger than the stock ATH-M50 pad.


The Shure pads fit a tad loose on the ATH-M50s, slightly more than the stock pads but not enough to fall off or freely rotate when using them. You can sew them to make them slightly smaller. I'm debating if I want to break out the thread.

The head-fi.org thread is full of people discussing about how the sound signature of the ATH-M50s change with new pads. I haven't noticed a change in sound but I have noticed a huge change in comfort. The Shure pads are plush and soft. I can wear the cans for hours on end and not feel any discomfort. Well worth the investment of time and money.

Shure 850 pads on the ATH-M50s


Sunday, June 1, 2014

Install Microsoft Office In Linux

PlayOnLinux is a graphical front-end for the Wine software compatibility layer which aims to simplify the installation of Windows-based applications and games on Linux. It uses an online database of scripts to apply to different applications that need special configuration.

There are many different ways to install Microsoft Office and other Windows programs in Linux but I enjoy the easy and simplicity of PlayONLinux.


To intall PlayOnLinux
sudo apt-get install playonlinux


The first time you run PlayOnLinux you'll be greeted with a wizard. Make sure you have an internet connection and hit next.


PlayOnLinux will update itself


Navigate to Install>Office>Microsoft Office 2010


A reminder will pop up, leave the default location and do not tick the checkbox 'Run the program' if asked. Click OK.


The Microsoft Office 2010 installation will begin


You can install office from a DVD or .exe file


Once you select your install media, PlayOnLinux will download and install the necessary software


And prepare Microsoft Office for installation on Linux


Enter your Product Key


 Accept the Terms and Conditions


 Click install now, to begin the process


Allow PlayOnLinux install Microsoft Office


Installation Complete


Now Microsoft Office is installed and configured