Thursday, April 23, 2015

Uubuntu 15.04 Vivid Vervet on the 2014 Dell XPS 13 - 9333

Ubuntu 15.04 and its community-maintained derivatives are the GNU/Linux releases that the 2014 Dell XPS 13 deserves. Shipping with the 3.19 Linux kernel, Ubuntu 15.04 Vivid Vervet has improved Intel Haswell chipset support, updates to the wi-fi driver stack, and improved multi-touch Elan touchpad drivers.

Installation of Ubuntu 15.04 is pretty straight forward. I focus on running Xubuntu, but below are are a few tweaks and tricks to get your Dell XPS 13 9393 running any Vivid Vervet release.

Sound fix
After installing Ubuntu 15.04 you may not have audio working properly on the 2014 Dell XPS. The fix is simple, you just need to turn off HDMI audio out. 

Left click the sound icon in the upper right hand corner of your desktop and select Sound Setting. Once in the Pulse Audio Volume Control navigate to the Configuration tab and set the


Suspend Fix
When installing Xubuntu you will have to set your laptop to suspend on close when on battery. Without changing this configuration the only the screen will turn off and your battery will continue to drain.

The 3.19 kernel handles suspend and wake wonderfully. To ensure you XPS 13 is suspending properly navigate to Settings>Power Manager. In the General settings tab, set When laptop lip is closed to Suspend while on battery.


Configure the Touchpad
Past Linux kernels have had broken Elan Touchpad drivers. Since the 3.16 kernel the Elan touchpad on the 2014 Dell XPS 13 has been able to accurate register two, three, and four finger gestures, finger width, and palm detection. Unfortunately the xorg-input driver has three and four finger detection disabled.  In order to re-enable them you will have to patch the xserver-xorg-input-synaptics driver.

The process is straight forward and a complete step-by-step guide can be found here.


Enable Smooth Tear Free Video Playback

Enabling Intel's tear free hardware settings allows for smooth tear-free video playback during videos and gaming with the Intel HD 4400 integrated graphic chipset.

To enable the Intel driver TearFree option in a terminal type:
sudo mkdir -p /etc/X11/xorg.conf.d/
sudo wget -q -O /etc/X11/xorg.conf.d/10-intel.conf http://xps13-9333.appspot.com/root/etc/X11/xorg.conf.d/10-intel.conf
Then reboot:
sudo reboot

Via the terminal check to see it was the enabled:
cat /var/log/Xorg.0.log | grep Tear

Your /etc/X11/xorg.conf.d/10-intel.conf file should contain the following:
# last update: 29 March 14
Section "Device"
    Identifier    "Intel Graphics"
    Driver        "intel"
    Option        "AccelMethod"  "sna"
    Option        "TearFree" "true"
EndSection
If the tear free option is no showing that it has been enabled check your configuration.

Disable Bluetooth at Startup
I never use bluetooth and find that having it enabled and turned on all the time is a waste of battery resources.

First disable the adapter, in a terminal:
sudo service bluetooth stop

To check in bluetooth is turned off or on, in a terminal type:
hciconfig

Now we need to keep the bluetooth adapter from turning back on when we reboot. Use your favorite editor (gedit, mousepad, nano, etc) to change the InitiallyPowered entry in your /etc/bluetooth/main.conf file from true to false.

In a terminal: (mousepad is the default text editor for Xubuntu, in Ubuntu use gedit, or for Kubuntu kedit)
gksu mousepad /etc/bluetooth/main.conf

Under the InitiallyPowered entry
Change:
InitiallyPowered = true


To:
InitiallyPowered = false


As always I want to thank the author of http://xps13-9333.appspot.com/

Tuesday, February 24, 2015

Enable Multitouch On The Dell XPS 13 (9333)

With 3.16 and newer kernels the Elan touchpad on the 2014 Dell XPS 13 is fully supported in Linux. The XPS's touchpad is able to register two, three, and four finger gestures, finger width, and palm detection. Unfortunately the xorg-input driver has three and four finger detection disabled.  In order to re-enable them you will have to patch the xserver-xorg-input-synaptics driver.


Install the necessary dependencies for xserver-xorg-input-synaptics
sudo apt-get build-dep xserver-xorg-input-synaptics

Download the source files for xserver-xorg-input-synaptics
apt-get source xserver-xorg-input-synaptics

Change to the xserver-xorg-input-synaptics directory. As of writing this article Xubuntu 14.10 is using 1.8.1, if the version number has changed or you distro uses a different naming scheme you will modify your cd command
cd ~/xserver-xorg-input-synaptics-1.8.1/

Download and apply the patch to enable multitouch support
wget http://xps13-9333.appspot.com/root/synaptics-swipe.patch -O - -q | patch -p1

or

wget https://dl.dropboxusercontent.com/u/6062904/synaptics-swipe.patch -O - -q | patch -p1

Change the version number so updates do not remove the patched driver. Follow the command line prompts. I used nano to edit the file.
sudo apt-get install devscripts
dch -i

Build the newly patched xserver-xorg-input-synaptics package while ignoring signing errors.
dpkg-buildpackage -uc -us

Then install your newly created xserver-xorg-input-synaptics deb

There are a couple ways to map the newly support gestures to actions. Below is my method but other will also work. 
sudo apt-get install xbindkeys xdotool

Create a .xbindkeyssrc configuration file
mousepad ~/.xbindkeysrc

Add the following to the /.xbindkeyssrc file:
"xdotool key Alt+Left"
  release + b:10

"xdotool key Alt+Right"
  release + b:11

"xdotool key Ctrl+Shift+Tab"
  release + b:8

"xdotool key Ctrl+Tab"
  release + b:9

Again there are different methods for setting the 3 finger gestures to actions but a simple startup script worked for me.
mkdir ~/.scripts
mousepad ~/.scripts/touchpad.sh

Add the following to your startup script
#!/bin/bash
    sleep 10s &&
    synclient SwipeThreeUpButton=8;
    synclient SwipeThreeDownButton=9;
    synclient SwipeThreeLeftButton=10;
    synclient SwipeThreeRightButton=11

Make the script executable
chmod +x ~/.scripts/touchpad.sh

Then make sure to add ~/.scripts/touchpad.sh to your starup programs.

I want to thank the author of http://xps13-9333.appspot.com/ who wrote the patch and helped me work through installing it on my system.
Wednesday, December 31, 2014

Adding Strain Relief to Your Logitech UE900 Cables

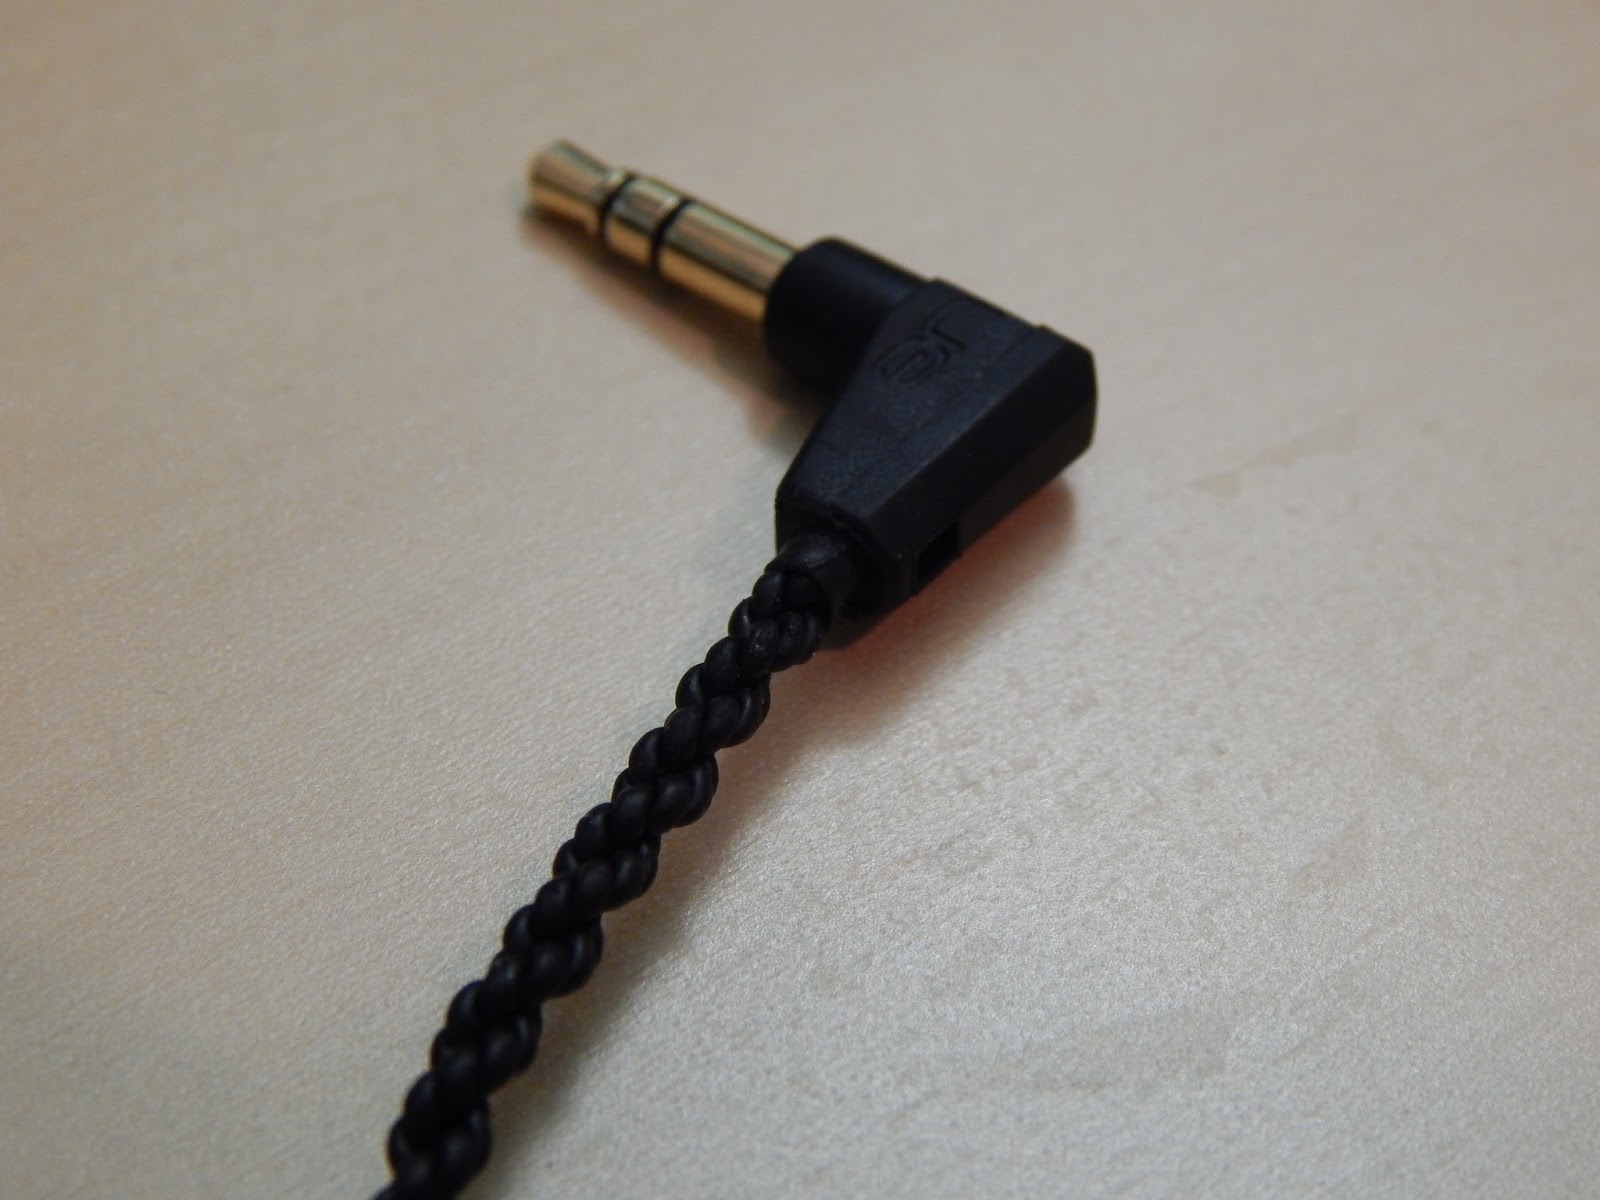
I purchased a UE900 Vi cable for my Shure 215s awhile ago. I really like how light the cable is compared to the stock Shure cable. The UE cable also significantly cuts down on cable microphonics. The only thing the UE cable lacked was proper strain relief at the TRS plug.


As you can see from the picture, the UE cable terminates into the TRS plug without proper strain relief. This design flaw allows the cable to bend sharply, especially when inside a pocket. This sharp bending will greatly reduce the lifespan of the cable. Fixing this design flaw is easy and works for any cable.

What you'll need:
  • spring
  • wire snips
  • shrink wrap
I pulled a spring out of a retractable ball point pen.


I then bent one end of the spring open so I could wrap it around the cable.


I made sure that the spring was wrapped around the plastic "collar" of the TRS plug.


I then snipped the excess spring from around the plug.


I threaded shrink wrap onto the cable starting from the top of the cable.


Placed the shrink wrap onto the TRS plug making sure there the spring was still attached to the collar of the the plug.


I applied heat to the shrink wrap and fixed a bit of the spring that was uneven at the top.


Now I don't have to worry about my cable being damaged when my player is sitting inside my pocket.

Sunday, December 28, 2014

Stop Xubuntu From Turning of Your Monitor Every 10 minutes

There is this nasty little bug in Xubuntu 14.04 and 14.10 that turns on a blank screensaver every ten minutes regardless of your power or light locker settings.

You can check your xset settings to see if your system is suffering from the same problem.

In a terminal type:

xset -q
Keyboard Control:
  auto repeat:  on    key click percent:  0    LED mask:  00000002
  XKB indicators:
    00: Caps Lock:   off    01: Num Lock:    on     02: Scroll Lock: off
    03: Compose:     off    04: Kana:        off    05: Sleep:       off
    06: Suspend:     off    07: Mute:        off    08: Misc:        off
    09: Mail:        off    10: Charging:    off    11: Shift Lock:  off
    12: Group 2:     off    13: Mouse Keys:  off
  auto repeat delay:  500    repeat rate:  20
  auto repeating keys:  00ffffffdffffbbf
                        fadfffefffedffff
                        9fffffffffffffff
                        fff7ffffffffffff
  bell percent:  50    bell pitch:  400    bell duration:  100
Pointer Control:
  acceleration:  13/10    threshold:  4
Screen Saver:
  prefer blanking:  yes    allow exposures:  yes
  timeout:  600    cycle:  600
Colors:
  default colormap:  0x20    BlackPixel:  0x0    WhitePixel:  0xffffff
Font Path:
  /usr/share/fonts/X11/misc,/usr/share/fonts/X11/Type1,built-ins
DPMS (Energy Star):
  Standby: 0    Suspend: 0    Off: 3600
  DPMS is Disabled
xset has been forcing a blank screensaver to activate every 600 secs (10 minutes).

Fixing it requires a simple terminal command:
xset s off

Install and Customize notify-osd in Xubuntu

I love Ubuntu's notification system, it manages to be both functional and beautiful, but it lacks customization options.

The following guide will show you how to install a custom version of Ubuntu's notify-osd that will allow you full control of the color, text, opacity, behavior and location of your notifications.

You first need to install two PPAs. leolik's PPA contains a customizable notify-osd package. amandeepgrewal's PPA includes notifyosdconfig, a gui interface that makes customizing notify-osd much easier.


To add leolik's PPA:
sudo add-apt-repository ppa:leolik/leolik

To add amandeepgrewal's PPA:
sudo add-apt-repository ppa:amandeepgrewal/notifyosdconfig

Install the necessary packages:
sudo apt-get update && sudo apt-get install notify-osd notifyosdconfig


For Xubuntu Users:

You can uninstall Xfcebuilt in notifaction system xfce4-notifyd:
sudo apt-get remove xfce4-notifyd


Or you can just set notify-osd as the default notification service. Sometimes after an Xubuntu update xfce-notifyd replaces notify-osd as your default notification service and you'll have to repeat this step.

Open a terminal:
gksu gedit /usr/share/dbus-1/services/org.xfce.xfce4-notifyd.Notifications.service

Replace:
Exec=/usr/lib/xfce4/notifyd/xfce4-notifyd

With:
Exec=/usr/lib/notify-osd/notify-osd

Save and exit.

You will have to reboot your computer for the changes to take effect.

Sources: 1 2 3

Sunday, December 21, 2014

Install Microsoft Fonts In Ubuntu

Install the Microsoft Core Fonts
sudo apt-get install msttcorefonts

Make a font directory
sudo mkdir /usr/share/fonts/Vista

Make a tempory storage directory
mkdir ~/Desktop/Vista

Download Microsoft Power Point Viewer 2007

Open the .exe file with Archive Manger

Double click ppviewer.cab file

Select each .TTF (TrueType font) file by single clicking it while holding down CTRL. Then select Extract. Save these fonts in the Desktop folder you created.

Move the extracted Microsoft fonts to your system font folder
sudo mv ~/Desktop/Vista /usr/share/fonts/Vista

Update your font cache
sudo fc-cache -fv

Your Windows fonts are ready to be used by any program or user on your system, you can delete the temporary Desktop folder.